Anyone think it’s difficult or expensive to get professional quality lighting? Here are a couple lighting setups to debunk those myths.
I was inspired to try out a couple ideas that I had generated on the drive home from the office recently, so immediately upon arriving at my abode I furiously turned the living room into a makeshift studio. I was particularly interested in testing this technique on a small scale since I have been wanting to build large, portable diffusion panels for a while now with this particular setup in mind. My three-year-old daughter, having apparently been watching too much America’s Next Top Model lately, willingly volunteered to be my victim, frequently repeating “Work it, work it …” as she made her way through a repertoire of poses.
Setup Time: 2-3 min.
Simple 2-Light Setup

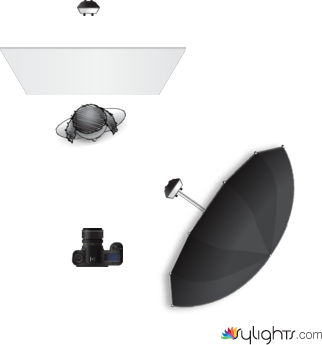
THE SETUP: A DIY diffusion panel was placed behind the subject to act as a simple backdrop. A Vivitar 283 was shot through the diffusion panel at about 1/2 power to brighten the backdrop and act as a rim light, and a Promaster 7000m was fired at full power into a DIY reflective umbrella to camera right at 45 degrees to subject.
Simple 3-Light Setup

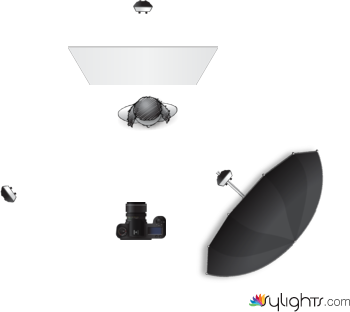
THE SETUP: A DIY diffusion panel was placed behind the subject to act as a simple backdrop. A Vivitar 283 was shot through the diffusion panel at about 1/2 power to brighten the backdrop and act as a rim light, and a Promaster 7000m was fired at full power into a DIY reflective umbrella to camera right at 45 degrees to subject. A cheap Pentax flash unit was used to camera left at 1/8 power (with a white sock — yes, a white ankle sock — for diffusion) to act as a fill/cross-light.
Notes
- Keep the light behind the diffusion panel at least a good 2-3 feet away. The further away you have the light the more even it will illuminate the panel/backdrop. Get the light too close, and you will end up with hotspots. Just remember, the further you move the light away the more you might need to increase its power.
- This is a very cost-effective setup. Beyond the cost of your lights (I use cheap, older units that can be purchased from eBay for under $35, including shipping), triggers (I have an eBay-bought, “Made in Hong Kong” set of one trigger and two receivers that I purchased for $24, including shipping, plus a $10 optical slave), and tripods to hold your lights, there is just the cost of the diffusion panel and umbrella, both do-it-yourself projects, in this case. The diffusion panel is small (about 30″x 36″) and is made from PVC pipe and white, translucent material (purchased at a local craft store) for a total cost of about $5-$7. The 39″ reflective umbrella (instructions and tutorial here) cost about $10-$13, not including lights and tripod.
- The only reason I used the umbrella in this case was because I haven’t built a second diffusion panel yet. If you were doing this with two panels the cost would be even less.
- Don’t have panels or want to spend the money on creating them? Simply hang a white sheet behind the subject (an adjustable curtain rod in a doorway works great for this…just make sure the sheet is stretched at least semi-taught) and shoot your keylight(s) through a second sheet.
- Want to go the absolute cheapest route? Simply use the sheets (as described above) with cheap clamp-on work lights with compact florescent bulbs (with a color temperature as close to 5500K as possible).
